Easter Banner

Easter Banner 3It’s Friday! And we are less than a month away from Easter.  With that being said – today’s DIY project is an easy way to dress up the mantle for the holiday.  For those of you who may not celebrate Easter, you can still use the same project to dress it up for “spring”.  In order to incorporate those great spring pastels, I created a super easy “happy easter” banner to hang across the mantle! I created this Easter banner using things that I already had around the house, however the materials still should not be very expensive so I will give you a cost estimate.

Materials:

  • Scrapbook paper in pastel colors (usually around $.50 – $1 per sheet – each sheet should be able to fit 2 banner triangles)
  • Yarn or any type of string/rope to attach the triangles to (I got my yarn for $1 from Big Lots)
  • Magic Marker in the color of your choice!
  • Tape

Instructions:

  • Step One: Cut out the banner pieces.  My triangles were approximately 4″ across the top and approximately 5″ in length.  You can make these smaller or larger depending on where you are hanging them and the look you are going for.
  • Step Two: Write each letter in magic marker! Ideas for phrases include Happy Easter, Spring, Spring has Sprung, etc… be creative! You can also use larger scrapbook sticker letters if you don’t trust your own handwriting. This will add to the cost – and I was looking for a super cheap way to dress up my mantle.
  • Step Three: Tape each banner triangle along the piece of string.  Make sure you make your string long enough to allow a slight sag in the middle.

What do you think? What are some other messages that you could use? I would love to see your mantle dressed up for the spring season!

Enjoy your weekend! I hope it is fun and full of DIY projects.

Easter Banner 1

Easter Banner 2


Wooden Tray

Wooden Tray 1

Happy Tuesday everyone! Today’s project is another easy one – a great one for beginners! The project comes straight from the girls at Shanty-2-Chic. This wooden tray can be used in a variety of ways.  In my apartment, I used it as a tray to hold magazines on my coffee table. Now I use it as a serving tray on the top shelf of my bar cart as shown below (sans corner hardware).

bar cart1

Now that you can see the versatility, let’s get started! I apologize for not having step-by-step pictures for these projects.  I am working on a coffee table that will be posted soon and it will have clear pictures!

Materials:

  • 1 – 1 x 3″ furring strip = $1.42
  • 1 – 1 x 4″ furring strip = $2.06
  • Wood Glue (like the Gorilla glue found here) = $5.97
  • Finishing Nails
  • Handles of your choice = approx. $2/each
  • Corner brackets = approx. $1/each
  • Clamp (not required)
  • Wood Stain (I used Rust-Oleum Dark Walnut found here) = $5.48     Note that this can be used for multiple projects!
  • Foam Brush (like this one) = $.77

Cuts:

  • 1 x 3″ furring strip = 5 – 18″ pieces (for the bottom of the tray)
  • 1 x 4″ furring strip = 2 – 12.25″ pieces & 2 – 19.5″ pieces (for the sides of the tray)

Instructions: (for pictures to follow along, visit Shanty-2-Chic’s tutorial in the link above)

Step One: After making all of your cuts (Note: Home Depot and Lowe’s will make the cuts for you for free if you know the cuts you need ahead of time!) you are now ready for assembly.  I started by using a small amount of glue to glue each of the long sides of the 18″ pieces together.  You now have the bottom of your tray!

Step Two: Glue the 12.25″ pieces to either end of the bottom of the tray you just created.  You now have the short sides of your tray in place. I then used a clamp to hold these steadily in place while gluing on the longer sides of the tray (however, if you have a handy-dandy helper they can hold them in place for you!)

Step Three: Glue the long sides of the tray to what has already been built and use finishing nails at the joints where the long sides meet the short sides of the tray. I used three nails at each joint.  It should now look like a tray!

Wooden Tray 2

Step Four: You are ready to stain! I used Rust-Oleum stain in Dark Walnut (see link within materials list). The Shanty-2-Chic girls used another painting method which you can check out on their blog. Before you begin staining, make sure you shake that can very well! Once shaken, take your foam brush, dip it in the stain, and start painting it on the tray in the same direction as the wood grain.  Make sure you do not over-saturate it and make sure to give it an even coat.  After about 15-20 minutes, lightly wipe off any excess with an old rag.  What does not get absorbed into the wood in that time frame will not end up soaking in and will leave a slightly sticky residue.

Step Five: The stain that I used dries in 1 hour! After that 1 hour was over, I sanded the edges to give it a slightly worn/distressed look.

Step Six: Add your hardware! I could not find a link to the handles that I used, but I found them in the hardware section at Lowe’s for about $2 a piece.  I also added corner L brackets found in the hardware section for about $1 a piece.

Now go find a perfect place to use this! I have used mine as a magazine tray and a serving tray on my bar cart. How will you use yours?


Blanket Ladder

Blanket LadderHappy Friday everyone! Today I will be sharing with you an easy project that you can do over the weekend! It is a great way to fill up some space in a seemingly empty room.  I crafted this ladder using the idea and the directions from one of my favorite blog’s Shanty-2-Chic.  The bloggers are two sisters who use their creativity and great taste to make furniture and home accessories primarily out of wood.  I love their style and the look of their homes, as well as every project that they post.  Many of the projects that I will make throughout Project Remodel will be based off of theirs.

This was another project that I finished prior to beginning this blog so I do not have step-by-step pictures, but again the project is a great one for beginners, so you will be able to follow along using Shanty-2-Chic’s directions here.  I will spell them out for you as well!

Materials:

  • 2 – 2×4 @ 8′ (sides of the ladder) = $2.97 each at Home Depot ($5.94 total)
  • 1 – 2×6 @ 8′ (rungs of the ladder)= $5.11 at Home Depot
  • Wood Stain = $5.48 at Lowe’s
  • Foam Brush = $.77
  • 16 – Wood Screws (2″)

Cuts:

  • 2×6 – Cut into 4 – 17″ pieces

Directions:

Step One: You will first screw the 17″ pieces onto one of the 2x4s.  These four 17″ pieces will be the rungs of your ladder.  First I measured three inches down from the top of the 2×4.  This is where I had the front corner of the top rung.  Now, angle the 17″ piece so that the bottom of the rung is flush with the back of the ladder.  If you are having trouble visualizing, take a look at Shanty-2-Chic’s pictures of the process.   I then used two wood screws to secure this side in place (you may want to pre-drill holes to make it easier and sturdier).  Do the same for the remaining three rungs – I spaced my 12″ apart.

Note: The talented girls at Shanty-2-Chic used a great tool to create pocket holes called the Kreg Jig.  I did not have this tool at the time so I did not utilize it but it is a great way to hide those screws!

Step Two: Now you can secure the other side of the ladder to the boards! Use two screws per rung once more and the ladder will be very sturdy.

Step Three: Whip out the wood stain of your choice and give this bad boy some color! I used Rust-Oleum Dark Walnut to give it a darker finish that will match the new media console and coffee table that are next on our project list!  My favorite method for applying stain is using a foam brush (like this one for $.77 at Home Depot).  Dip the brush in the stain and brush an even coat onto the wood.  Be sure to brush it on in the same direction as the grain of the wood.

Note: Make sure you shake up your can of stain very well before application!!

Step Four: After your apply your coat of stain, go back 15-20 minutes later and wipe off any excess using an old rag.  Anything that does not soak into the wood in that time frame will not soak into the wood at all and it will leave a slightly sticky residue. The stain I used dries in 1 hour, so after that hour goes by, move on to step five!

Step Five: If you are going for that worn/rustic look, take a sander (or I just used sandpaper by hand) and rough it up a bit! Make sure you sand going in the same direction as the grain of the wood.

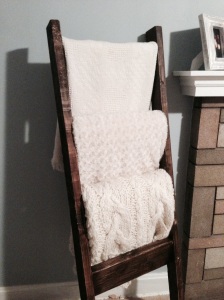
Step Six: To be safe, I let this ladder dry completely overnight before putting my cozy blankets on those rungs.  I have not had any issues with the stain rubbing off onto the materials, however if you are worried about the possibility of that happening you can use a coat of polyurethane like this Rust-Oleum Matte Finish Poly.

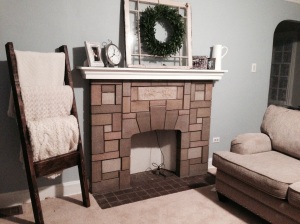
Once the night has passed, dress the ladder up and put it wherever you choose!  Here is mine next to my fireplace (pay no mind to those random wires hanging in the fireplace).

Blanket Ladder 2

How did yours turn out? Where did you decide to use your new ladder? Did you use it for anything besides blankets? Let me know!

Restore Your Home and ReStore Humanity

Restore2

While my blog will mainly focus on DIY projects related to home remodeling, I have to let you in on a not-so-secret store that I love for my remodeling projects! Greater Cleveland’s Habitat for Humanity ReStore is the perfect place to find salvaged materials (and cheap ones at that!) for all of your latest home projects.  Whether you are looking for a bath tub, kitchen cabinet hardware, or anything in between, the ReStore is the place to find it.  Below you will see my mantle, which is spruced up with an old window – purchased from the Cleveland ReStore! There are endless possibilities when it comes to salvaged materials – just let your creativity flow.Mantle

Aside from the steep discount that ReStore offers, you are also giving back to the community.  Have you ever heard of Habitat for Humanity? If not, Habitat for Humanity rehabilitates and builds houses for low-income, struggling communities and families.  ReStore is a non-profit home improvement store whose proceeds go directly to Habitat for Humanity and will help to finance the homes built within your community.

What are you waiting for? Find the closest ReStore here. Your next home improvement project is waiting for you!

Has anyone else visited a ReStore? What projects did you complete with the help of ReStore?


Everybody has to E A T

EAT

Welcome back y’all! I decided to show you all one of the easiest projects that I have completed – and a cheap one as well! After spending hours upon hours briefly glancing at Pinterest for an easy way to add some art to the kitchen, I decided that what better way to spruce it up then to use the word EAT.  Everybody’s gotta eat right? So I brainstormed, and decided that a metallic EAT sign would be the perfect complement to my Light French Gray walls by Sherwin Williams and new Hi-Macs countertops in Ripe Cotton.  Unfortunately, I did not take pictures of the process – however I don’t think you will have trouble following along (buying letters and spray-painting them).

Materials:

  • Cardboard/Paper Mache letters
  • Spray paint
  • Sawtooth Picture Hangers

Time:  About 30 minutes (after shopping!)

Step One: Take a trip to your local Hobby Lobby, Jo-Ann Fabrics, or Michael’s store and purchase cardboard letters in the size of your choice.  (Lazy like I am? Purchase them online from Jo-Ann Fabrics here).  The 8″ letters were $2.99 each while the 12″ letters were $4.99 each. I opted for the 12″ as I had a larger space to fill.

Step Two: Continue your journey on to Home Depot or Lowe’s to purchase the spray paint in whichever color your heart desires.  While the craft stores sell spray paint as well, I have found that they are way more expensive than going to Lowe’s or Home Depot.  As I wanted a brushed silver look to match the hardware on my cabinets, I went for Rust-Oleum Antique Nickel (you can purchase online here – $6.76). I plan on using this color for multiple projects in the near future, so the $7 is well worth it!

Step Three: Now that your shopping is complete, take your supplies to a well ventilated area and spray these bad boys down! Make sure to take off the bar code stickers prior to spraying (learned that the hard way).  I used two coats (and waiting about 20 minutes in between coats) to make sure the color was covering the letters.

Step Four: Once they are dry, you are ready to hang ’em up! I used sawtooth picture hangers (like these ones – $1.94 for 3). Make sure you gently hammer these into place as the cardboard is not very sturdy.  Hang them in the top middle of each letter and then figure out where you can show these off!

Looking for other cute EAT ideas? Chalkboard paint works miracles! My favorite chalkboard spray paint is Rust-Oleum Chalkboard Spray Paint ($3.76).  The kiddies can doodle on these while you are slaving away over the stove!

What do you think? How did yours turn out? Have any other grEAT ideas? Let me know!

What Exactly is this Project?

Outside

My fiancée and I recently purchased a house in the suburbs of Cleveland, Ohio.  As you know, being a first-time homebuyer can really break the bank, so my goal was to achieve the expensive looks I love for a fraction of the price.  In order to do this, I had to put down my Kate Spade purse and pick up a hammer (ugh!) and get down and dirty.  Thankfully, my fiancée is handy (and has every tool a girl could need) so I had all that I needed to let the learning process begin.  I have found some amazing bloggers whom I now follow religiously, and throughout my journey to remodel our new house, I will be recreating many of their projects.  Making your own furniture and home accessories is easier than it sounds (and way cheaper than buying new) as I have come to find out!

So please follow along and post any ideas that you have! It will take some time, but eventually this will be the house of our dreams!